
Tuesday, 20 September 2011
Dasher
It was time to pull out dasher this year. I'm not even sure I got around to using him last year. I decided to do a brayered background for him. I haven't had alot of experience yet with this but I think I like the effect. I used wisteria wonder and bashful blue for the brayering. Trees were stamped in basic great. Dasher was stamped in Night of Navy craft ink and then embossed. And Seasons Greeting was stamped in versamark and then embossed with the new pewter embossing powder. I also used a little of the dazzling details on dashers antlers as well as the snow along the bottom of the trees.

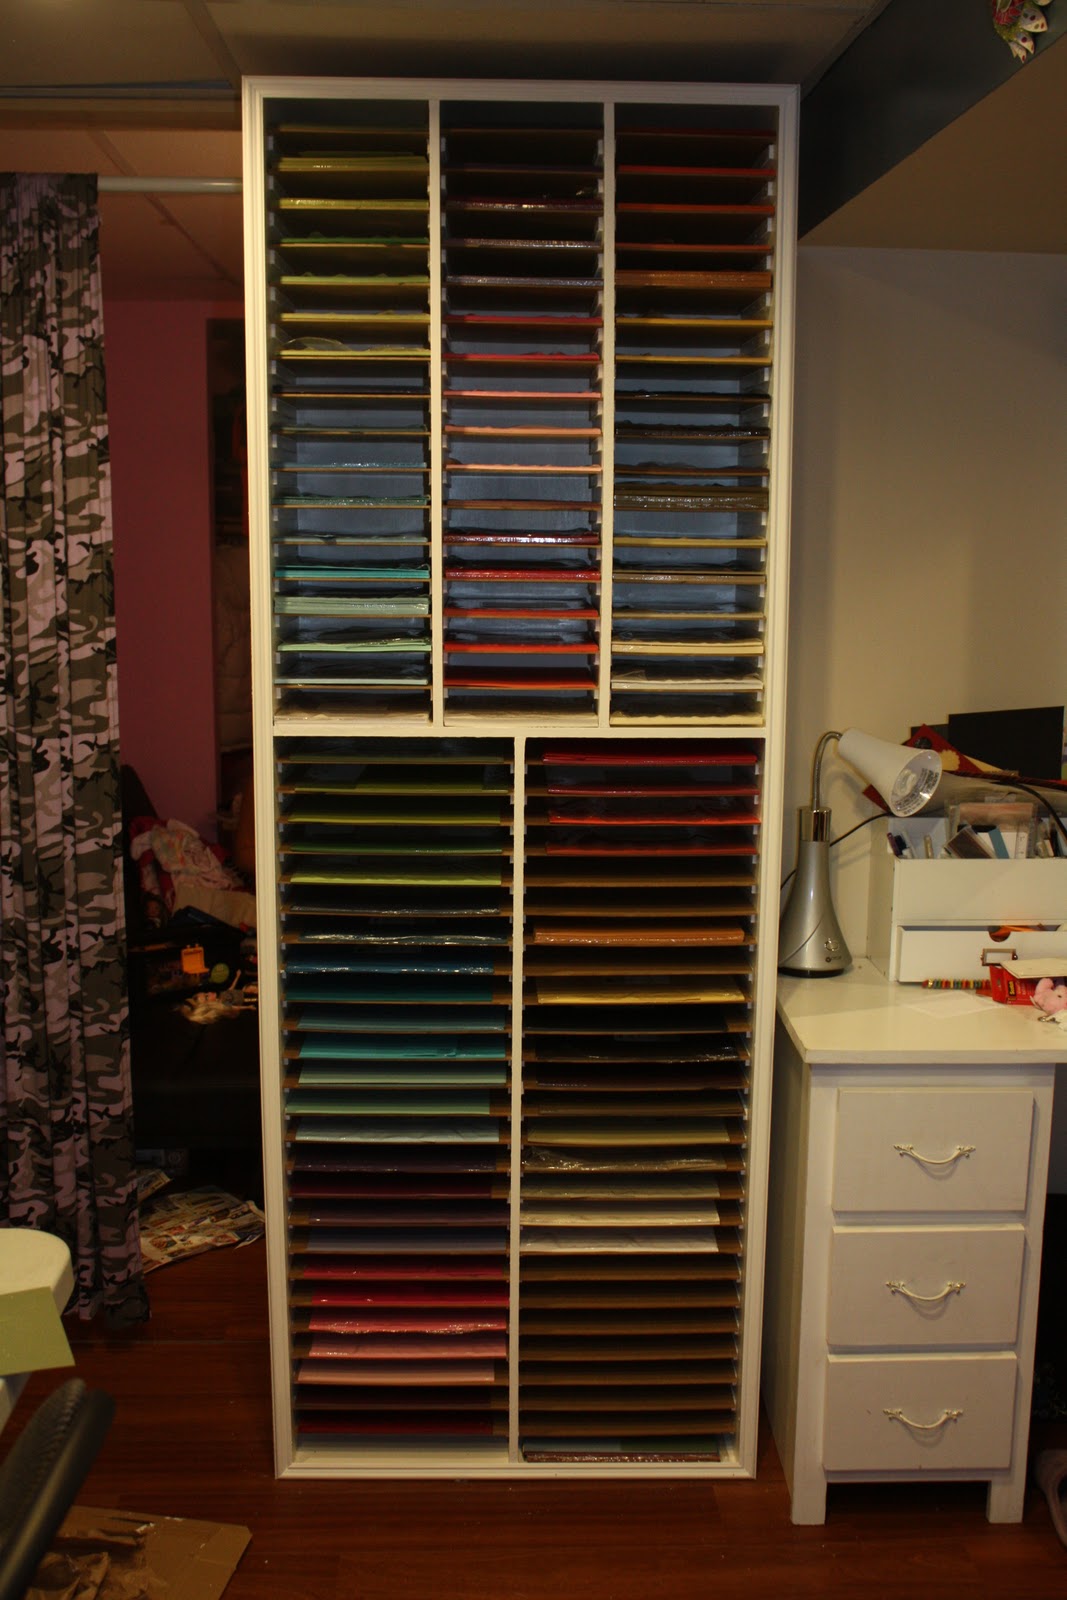
My newest addition to my scrapbooking room
I have been wanting a shelf for just my cardstock for quite some time now, I've seen some people who have had wonderful shelves for storing their cardstock by color and laying it flat the way it should be stored. Unfortunately I had not been able to find anything affordable so I had to make due with what I was able to find. Well up till this past weekend anyways. I was lucky enough to have one built for me. Who built it for me? Well that would be my wonderful boyfriend. He built it, but I had to paint it. The shelves themselves have not been painted yet as the actual framing for it with the slats for each shelf took me almost 8 hrs to paint and let me tell you, my arms were so sore afterwards. But the end result was worth it. The shelvs will wait till next summer to get painted, and I think I might just spray paint them and make my life a little easier. Well I know your dying to see it, so here it is, this is it before I painted it and no shelves yet.


The next picture is of the framing and slats all nicely painted and the shelves before I aded all my paper.

And the final picture shows all my cardstock nicely sorted :)
Monday, 19 September 2011
Countdown to Christmas Calender
This was a work in a progress over the last couple of weeks. I had gotten the stamp set for free as an incentive for recruiting. So I got busy getting my little 1" squares colored and punched out, used circles for a couple as well. Then had to wait till I had the die to do the little peek a boo frames. Due to the time required I was kind of putting off finishing this project. But then I told someone I would donate it as a prize for a fundraiser. With less then a week to go till the fundraiser I had to hurry up and get it finished. So today I finished it up, went and bought a frame for it and am quite happy with the end result. All items seen on here with the exception of the frame can be purchased through me with Stampin Up.


Sunday, 4 September 2011
Christmas Ornament Tutorial
As promised here is my tutorial for the Christmas Ornament. For this you will need a piece of ribbon approximately 6”-8” long, 2 coordinating dsp’s. One of these you will see both sides with the cones that you are about to make so make sure that you like both sides. Once you have selected your papers, put aside the one you are going to use for your top layer as that will be your last step.
With the 1st dsp you’re going to cut out squares, depending on what size ornament you want as a finished product will determine what size squares to cut, 6”, 4” or 3” (finished size). You will want to cut your squares at 2”, 1 ½” or 1”. The 1” squares are a little harder to work with due to their size but makes a very cute finished ornament. For this ornament pictured I used 1 ½” squares.
Once you’ve got all your squares cut you’ll want to curl your paper, this will make it easier to make it into cone shapes. You’ll want to curl it from the middle diagonally to the outside edge. It should look like this.

Now that you’ve got all your squares curled, you’ll want to make them into cones, they should look like this.

It’s time to make sure that these cones keep their shape, to do that we need to use some adhesive. The first few I made I used Tombow Liquid Glue. This worked great as it doesn’t dry immediately and allows you to reposition if you need to. However your fingers do tend to get a bit messy by the end. For my last one that I made, the one pictured in this tutorial I tried 1/8” sticky strip which I found to work quite well and it wasn’t as messy. If you choose to use this you will need to be more careful as it is not repositionable. If you are making the 2” squares you will need 15, if not you will only need 14 cones. Your cones should look like this.

Punch out a 1 ¾” circle, you will use this to glue your cones onto. I used Tombow glue for this as it allows you to keep moving the cones around until you have them just the way you want them.

Next you’re going to want to make the middle section. I’ve heard these being called many different things and am still not sure what they’re supposed to be called. But they are very simple to make. Again depending on the size ornament you chose to make will depend on the size of dsp strip to cut. For the large one I used a two 1 ½” x12” strip, for the , medium one I used a 1”x12” strip and for the smallest I used a ¾” x12” strip. For the larger one I scored at every half inch. Once both strips were done I attached them, you’ll want to attach them so that they form a circle. The other two were scored at ¼” intervals. Punch out a 1 ¾” circle again and use to hold the shape. I used sticky strip to attach it. Heather Summers also has a wonderful way of getting them to hold their shape. Embellish the center how you wish. I used a hot glue gun to adhere the accordion flower to the bottom part of the ornament.

Once you’ve this all attached you’ll need to punch a hole at the top of the ornament in one of the cones. I used my crop o dile for this. And this is my finished ornament.

Hope my tutorial was helpful. Please feel free to ask any questions that you might have. I've love to see what you come up with if you'd like to share.
Saturday, 3 September 2011
It's never too early to start thinking about Christmas
Christmas is such a fun time of year and even though it's just barely September I've started playing around with different ideas. Tonight I came across a really neat idea for a Christmas Ornament. I will be posting a tutorial in the next few days, so if your wanting to see how these are made, keep watching.


The First one was made using the new Santa's Letters DSP and the second one was with a retired DSP called Jolly Holiday. I used one of the new large buttons on the second one. And am happy that I finally found a use for them. Yes they are as big as they look, but on here it looks great. Also I changed the dimensions around a little on the 2nd one. This will all be included in my upcoming tutorial. Thanks for stopping by.
Subscribe to:
Posts (Atom)